Queues, agents, and automatic allocation
Queues split your helpdesk into groups, for example one queue per department. Each queue has its own agents, session limits, notification settings, and working hours. Clients wait in a queue until an agent picks them up or Druid allocates them automatically. Agents can transfer a client to another queue or to a specific agent.
If you don't create queues, all agents belong to one global queue.
Prerequisites
- Live Chat is set up. See Set up Live Chat.
- Each helpdesk agent is a Druid Portal user with the Helpdesk Agent role (Administration > Users).
- Managers who oversee agents are Druid Portal users with the Manager role.
Add Live Chat agents
Add each helpdesk agent under Live Chat Agents before you assign them to queues. Only Live Chat agents appear when you add agents to a queue.
- Select the AI Agent and the solution.
- In the menu, select Solution Contents > Live Chat Agents.
- Select Create new agent.
- In User, select the helpdesk agent.
- Optional: in Manager, select the manager who oversees the agent.
- Optional: turn on Display connect button at queue level. It works the same as the queue setting of the same name.
- Select Save. The Edit agent dialog opens, with a Working hours tab. To set a schedule, see Working hours and automatic sign-out.
- Select Save & Close.
The Live Chat Agents list shows each agent's queues, working hours, and status. Use Include inactive and Custom working hours to filter the list.
Create a queue and assign agents
- In the menu, select Solution Contents > Live Chat Queues.
- Select Create new queue.
- Fill in the queue settings. See the table below.
- Select Save. The dialog changes to Edit queue and shows the Agents and Working hours tabs. Name now has one field per AI Agent language.
- On the Agents tab, select Add agent.
- In Select users, select the agents, and then select Save. A Warning dialog lists agents who have their own working hours.
- To apply the queue's working hours to an agent, select the agent. Then select Continue. To keep each agent's own working hours, select Continue without selecting anyone.
- Select Save & Close.
You can assign an agent to several queues. To let agents transfer clients to a specific agent, you can also create a queue per agent.
| Setting | Description | Required | Default |
|---|---|---|---|
| Code | The queue code. It's language-independent; you use it in flows. | Yes | — |
| Name | The queue name shown to users. After the first save, you can enter it in each AI Agent language. | Yes | — |
| Description | A description of the queue. | No | — |
| Manager | The manager responsible for the queue. | No | None |
| Send sound notifications | When the agent's browser plays a sound for new messages. Never: no sound. Only when out of focus: only when the agent page isn't the active tab. Always: always. If an agent belongs to several queues, the agent gets sounds when at least one queue sends them. | — | Always |
| Max number of active sessions | How many live chats an agent in this queue can handle at the same time. Allowed values: 1–5. | Yes | 5 |
| Max number of sessions for automatic allocation | How many live chats Druid allocates automatically to an agent in this queue. 0 turns automatic allocation off for the queue. See Queues, agents, and automatic allocation. |
Yes | 0 |
| Is Active | Makes the queue available. Inactive queues are hidden from the list unless you select Include inactive. | — | On |
| Display connect button at queue level | Shows a Connect button that connects the agent to the client who has waited longest in any of the agent's queues, regardless of priority. Useful for agents in several queues. | — | Off |
Route clients to a queue
To place a client in a specific queue, call the ConnectToHelpdeskAgent internal action from a flow, for example in Post Actions of an Action step. In Live Chat Advanced, the live-chat-connect-to-agent flow already does this with the queue the client chooses.
Pass the queue code (not the queue name), either as a value or in JSON:
{
  "QueueCode": "[[MyEntity]].CodeOfTheQueue",
  "AutomaticAllocation": true,
  "PriorityLevel": "@priority"
}| Parameter | Description | Default |
|---|---|---|
QueueCode
|
The queue code, as an entity field ([[Entity]].QueueCode), a local variable (@queue_code), or a string ("Loans"). |
Global queue |
AutomaticAllocation
|
true allocates the client to an available agent automatically. |
false
|
PriorityLevel
|
The client's priority: Normal, Medium, or High. Use a local variable or entity field. | Normal |
ConnectToHelpdeskAgent returns false in @InternalActionResult when Druid can't place the client in the queue. For example, this happens outside the queue's working hours ([[HelpdeskClient]].IsOutsideWorkingHours is true), or when the client is blocked. See Working hours and automatic sign-out and Block chat users.
How priority affects the queue order
Clients with a higher priority wait ahead of clients with a lower priority. Within the same priority, clients are served first in, first out (FIFO).
Example: queue A has 3 High-priority clients and 2 Normal-priority clients. A new High-priority client joins queue A after the existing High-priority clients and before the Normal-priority clients.
If an agent belongs to several queues, the agent sees the High-priority clients from all those queues before the Normal-priority clients.
To prevent clients from sending files during a live chat, set [[ChatUser]].BlockFileUpload to true. If Hide Upload Button is selected on the AI Agent, file upload is unavailable regardless of this value. Agents can Multichat for helpdesk agents.
Transfer clients to another queue or agent
Agents transfer a client by asking the AI Agent Assistant in Multichat, for example "transfer chat". Live Chat Advanced includes the live-chat-transfer-client flow for this.
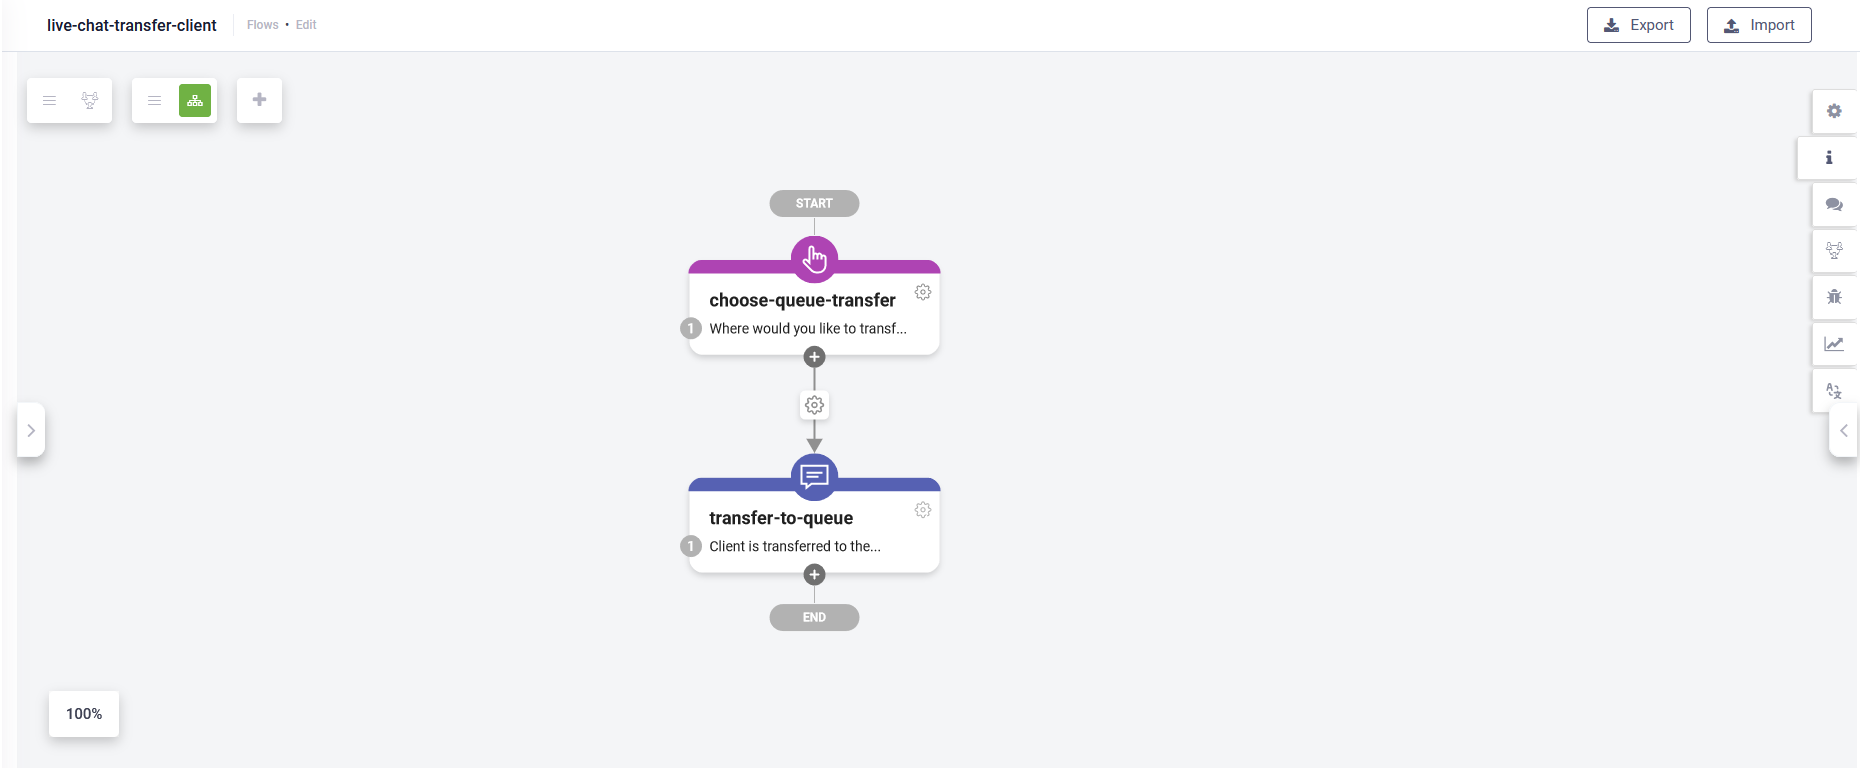
The live-chat-transfer-client flow has two steps:
- choose-queue-transfer (Choice) asks "Where would you like to transfer [[HelpdeskClient]].ClientName?" and stores the chosen queue code in
@queue. Add one choice per queue. - transfer-to-queue (Message) tells the agent that the client was transferred and calls the
TransferHelpdeskCallinternal action with@queuein Pre Actions.
To transfer to a specific agent instead of a queue, pass the agent's ID, for example [[HelpdeskAgent]].AgentId, to TransferHelpdeskCall.
TransferHelpdeskCall accepts the same JSON parameters as ConnectToHelpdeskAgent: QueueCode, AutomaticAllocation, and PriorityLevel. Transferred clients join the end of the new queue. To show a Connect button next to transferred clients, so agents can pick them up first, add "DisplayConnectButton": true.
If you create your own transfer flow, assign it the Helpdesk Agent role and add training phrases that agents will use.
 Get the list of online agents before a transfer
To check who is online before transferring, call the GetOnlineHelpdeskAgents internal action in an Action step. Live Chat Advanced includes the live-chat-get-online-helpdeskagents flow ("show me the list of available agents"), which shows the number of waiting clients and connected agents.
Pass a queue code to get the agents of one queue, as [[Entity]].QueueCode, @queueCode, or "<queueCode>". Without a queue code, you get all online agents. The result is stored in [[HelpdeskAgentList]].
Automatic allocation
With automatic allocation, Druid connects a waiting client to an available agent without the agent picking up the client. This spreads the work evenly and reduces waiting times.
An agent is available when they're signed in, have fewer live chats than the concurrent chat limit, and haven't requested a break or a log-out.
To turn on automatic allocation:
- Set Max number of sessions for automatic allocation to a value greater than
0: - With queues: on each queue. - Without queues: in the AI Agent details, Live Chat section. - Add
"AutomaticAllocation": truetoConnectToHelpdeskAgent, and toTransferHelpdeskCallfor transfers. See Queues, agents, and automatic allocation.
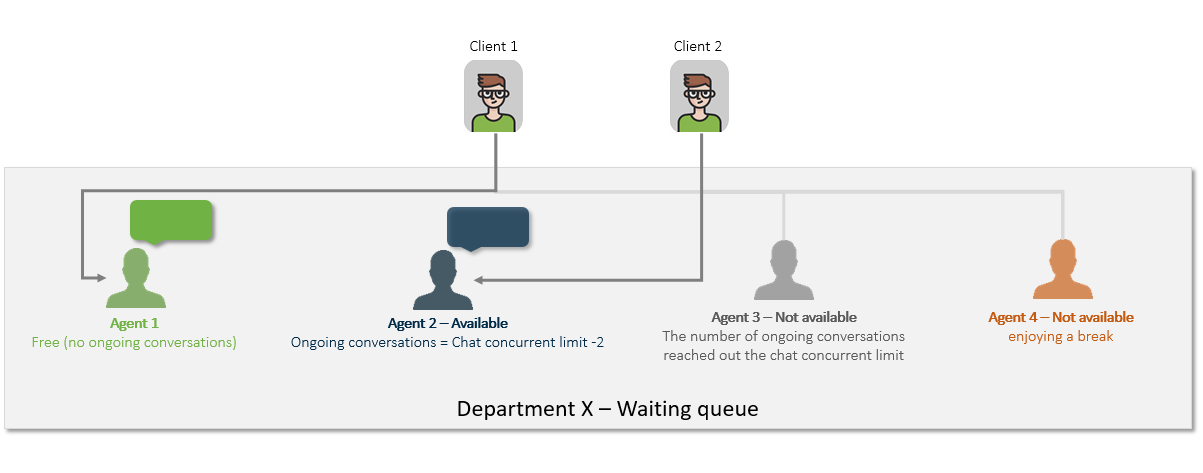
Druid allocates each waiting client as follows:
- To an agent with no ongoing live chats.
- If no agent is free, to the agent below the concurrent chat limit with the fewest connected clients. If several agents have the same number, to the one whose last connection to a client is the oldest.
- If all agents are at the limit, on break, or have requested a break, the client stays in the queue until an agent becomes available.
Druid looks for agents only in the queue where the client was placed. It doesn't move the client to another queue.
Druid stops allocating clients automatically in a queue outside the queue's working hours. Agents can still pick up waiting clients manually.
How Druid calculates the concurrent chat limit
When limits are set in more than one place, Druid uses the smallest value:
- Max number of active sessions on the AI Agent and on the queue: Druid uses the smaller value.
- An agent in several queues: Druid uses the smallest value of all the agent's queues for automatic allocation.
Example: queue A has Max number of active sessions = 2, queue B = 3, and the AI Agent = 4. An agent in both queues gets at most 2 sessions automatically. The agent can pick up 2 more clients manually from queue B.
The maximum concurrent chats supported for one agent is 5. You can change this limit only on external agent pages.
Breaks and log-out requests
Agents request a break or log out from Multichat. Live Chat Advanced includes the flows that handle these requests: RequestHelpdeskAgentBreak, CancelHelpdeskAgentBreakRequest, StartHelpdeskAgentBreak, EndHelpdeskAgentBreak, RequestHelpdeskAgentLogOut, and CancelHelpdeskAgentLogOutRequest. Druid doesn't allocate clients to agents on break.
If these flows are missing from your solution, upgrade the Live Chat Advanced solution. See Upgrading Solution Templates. For what agents see, see Multichat for helpdesk agents.
To run automation before an agent connects to a client, see Live Chat Advanced flows.
To set the word sent when an agent pauses a chat, see Set up Live Chat.
Related Topics